Reading Lists makes it easy to create, manage and evaluate your subject readings by:
- collating all subject readings in one place;
- organising the readings to complement the subject delivery schedule - by week, topic or module;
- allowing you to collaborate with colleagues to build a reading list that can be used by all cohorts;
- allowing you to reuse a reading list from session to session; and
- collecting analytics such as full-text views to assess student engagement.
Creating a reading list has four major steps:
- Creating the list
- Adding resources
- Sending to the Library
- Publishing the list for students to view
Create your list
- In the Lists section, select + New List
- Enter a Title – this should consist of your subject name and number e.g., “240710 Digital Consumer Behaviour”. Add a description (not required) and select
- On the next page, select a template or choose Blank to create your own.
Adding resources to your list
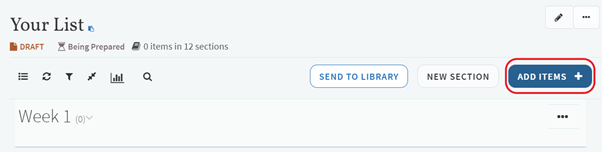
When viewing a list, select Add Items to open the search panel.
Adding Library resources
Select the Add Library Items tab to search the Library’s catalogue from here either by author, keyword, or title. Search results will also display the format, location, and availability.
Drag-and-drop search result items to your list to add them. Electronic items will have the status of Complete immediately whereas print items will have the status Being Prepared.
Due to licensing restrictions, articles from the Harvard Business Review cannot be linked to directly. Provide the Harvard Business Review link and advise your students to search for the title of their required article to access it.
Adding web resources
You can add a resource from the web by using the Cite It! Widget or by manually creating the citation.
To install Cite It on your browser, click on your username in the top right-hand corner and select Cite It! from the drop-down menu. Drag-and-drop the button to your favourites bar to add the widget.
Using Cite It! widget
- On the webpage or video you wish to add, click the Cite It! button on your bookmark bar
- Select which list or section you wish to add it to and select Add & Close
Manually adding readings
From the search panel (opened by selecting Add Items), select the Create a citation tab.
- Complete the details including the title, author, and source (URL for webpages)
- Select the type of resource from the drop-down menu e.g website
- Select the section of your list you want to place the citation
- Select Add to add the resources to your list
Reading statuses
A reading will have one of the following statuses:
- Being Prepared – The initial status when you are preparing your list.
- Sent – You have sent the reading (or the entire list) to the Library for processing.
- In Process – Library staff have begun working on a reading.
- Complete – Library staff have finished preparing the reading.
- Declined – The library was unable to fulfill the reading request.
- Inactive – The reading was migrated from your previous collection in the Digital Resources Register. If you would like the reading to be reactivated, click on the reading and contact the Library via Library Discussion in the right hand side column.
Editing your list
To move a reading in your list to a new position or section:
- Hover over the item, a blue panel will appear on the right of the reading.
- Drag-and-drop the item to its new location.
To add a new section to your list:
- Select New Section at the top of the list.
- Enter the title, description (optional), and visible dates (optional) of the new section.
- Select the Create
To move your new section:
- Collapse the section by clicking the section title.
- Hover over the section, a blue panel will appear on the right.
- Using the blue panel, drag-and-drop it to your desired position.
Select the ellipses on a section title to edit or delete it.
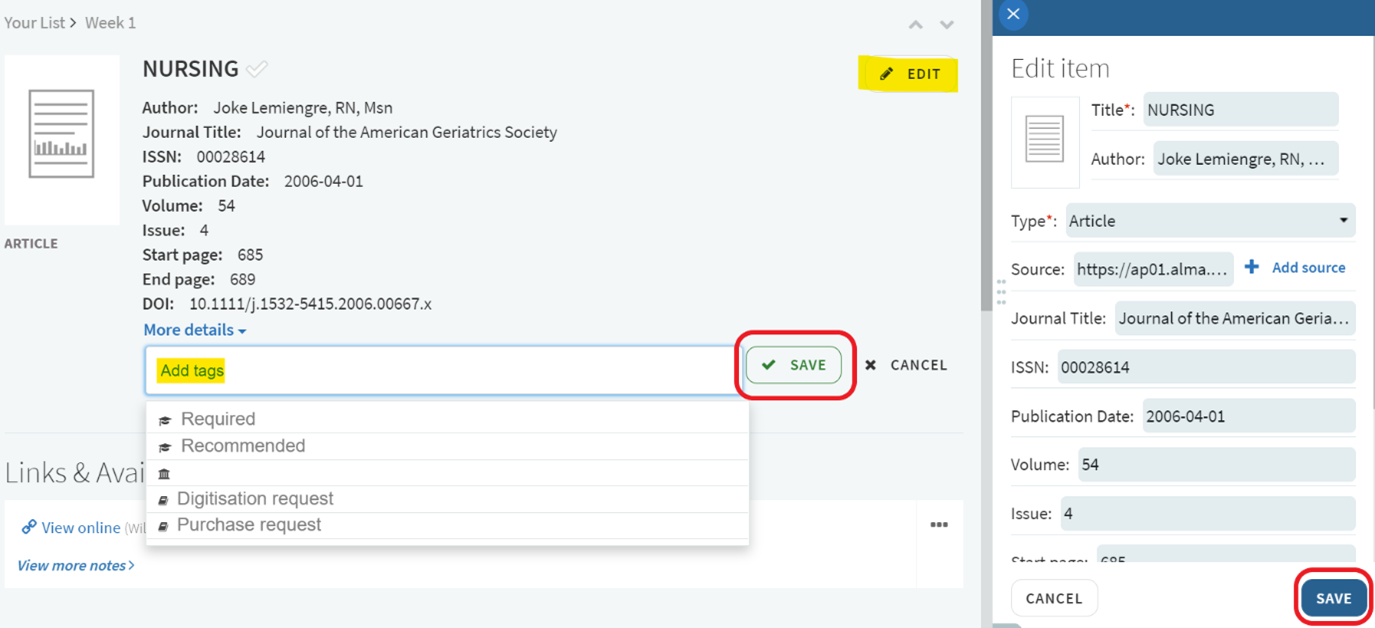
Editing a reading
Click a reading to view its details and select Edit to open the Edit item panel.
Creating chapters
To specify a chapter of a physical resource:
- Add the resource to your list and select Edit.
- In Type select Book Chapter.
- Enter the Chapter title, Chapter author, Chapter number, Start page, and End page.
- Select Save.
Public note
In the Edit item panel enter a note to communicate information, tips, or instructions to your students.
Reading due dates
In the Edit item panel, select the Calendar icon to set a date the reading is to be completed by.
Reading tags
Tags that indicate the nature or importance of the item e.g., “recommended”, “required” or “further readings”. Tags are useful tools to indicate to students the nature or importance of an item. Students can filter lists by their tags to view only items labelled that tag.
Visit Purchase and Digitisation Requests for further details on tags.
Deleting items from your list
To delete an item from your list:
- Click the ellipses icon next to the reading
- Select Delete item from the drop-down menu. Please note: Once you delete and item you will not be able to retrieve the item again
Notes
- Private Notes can only be seen by you and your collaborators to use as reminders, observations, or points to be noted.
Send to Library
Once ready, send your list to the Library to be reviewed and have resources prepared.
Publishing your list
When viewing your list, select the ellipses next to the list title, then select Publish.
Re-using your list
Reading lists are archived at the end of each teaching session. When a subject is re-run in a future teaching session, the Library will roll the previous Reading List over to the new session subject and prepare it for editing. If your subject has a Reading List from a previous teaching session, it will be available for editing four weeks before the start of the new teaching session (including Orientation). If your list is not available, please contact the Library.